June 6, 2011

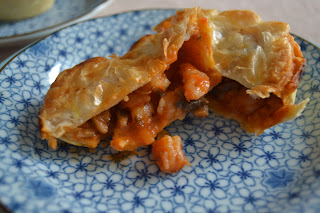
Shrimp Pies

I made shrimp pies awhile ago ... To be more exact 10 months ago.


I have this thing with pies that from time to time I have to make one. I think they are so easy to make and taste soooo good that the time you spend making them is worth every minute. There are so many choices of pastries or fillings that I am sure anyone can have a favorite. I just love that they can be beautiful, delicious, comforting and impressive! Isn’t it amazing that people always say “I don’t know how you do that, looks so complicated!”. Ok, the truth is it can be complicated but it can also be really simple if you use frozen pie dough from you grocery store. Or you can do what I did: I used home-made shortcrust pastry for the bottom of my pies  and ready-made puff pastry for the top.

I’m not sure if you remember when I made minced beef pies, back in August. After finishing them I had some leftovers for shortcrust pastry and I’m sure you agree that I couldn’t waste it and that was when I decided I would make shrimp pies as well … But because the leftover wasn’t enough for all pies I made the tops with ready-made pastry. What does this tell you? First, that I was a bit lazy that morning and second that improvising is fine. You don’t need to be a chef or a super skilled cook to make a pie.

And this is how I did it :

My Shrimp Pies
Makes 6 small pies

shortcrust pastry (recipe here)
1 ½ sheets of store bought puff pastry
300g of shrimps
½ cup of chopped onions
½ cup of chopped green peppers
½ cup of tomato sauce
½ cup of chopped white mushrooms
1 tablespoon of olive oil
Salt and black pepper
1 egg yolk

Separate the sheets of puff pastry and divide each sheet in 4 squares. Pre-heat the oven to 180o C. Butter a muffin tray. Open the shortcrust pastry and divide it in 6 squares. Place 1 square of pastry in each whole.

To prepare the filling, add the olive oil to a medium pan and sauté the onions, add the green peppers, shrimps, mushrooms, tomato sauce and cook for 5 minutes in medium flame. Season with salt and black pepper. Fill each pie with 3 tablespoons of filling and cover each pie with another square of puff pastry.


Bring the tray to the oven and cook for 15 min or until golden.


And then you just have to enjoy!

May 30, 2011

Chicken Salad


Hi there, how was your week? Mine was chaotic with several things happening at the same time but at the end all worked out very well.

I feel that summer arrived in Hong Kong and we are having a mix of rainy and beautiful sunny days and if I could I would spend my days by the beach, doing nothing and enjoying my family and friends company. We have less than a month left before our move back to Brazil and the days are starting to go faster than they should.

For today’s post I have the easiest recipe that goes so well with hot days: a quick chicken salad. This salad can be a meal on its own or can be used for a nice sandwich filling. You choose.


Chicken Salad

1 cup of cooked chicken breast chopped
½ cup of green apples, peeled and chopped
½ cup of chopped celery
½ cup of green onions chopped
lettuce
½ cup of natural yogurt
1 teaspoon of Dijon mustard
2 tablespoons of lemon juice
Salt and black pepper

1 - Start cooking the chicken breast. You can either poach it in water or vegetable stock or grill it. I like a mix of both so I get tender pieces of chicken mixed with crunchier grilled ones. If you are poaching the chicken in water I suggest that you add some seasoning to the water. Once cooked let it cool down;
2 - Peel the apples, remove the cores and chop them. Place the apples in a bowl filled with water and one tea spoon of salt so they don’t go brown;
3 - Wash one celery stick very well and chop it finely. Do the same with the green onions;
4 - In a medium bowl prepare the salad sauce mixing the yogurt, mustard, lemon juice, salt and pepper. Reserve.
5 - In another bowl mix the chicken, apples, celery and green onions. Add the sauce and mix well until all pieces are coated. Serve with lettuce.


May 23, 2011

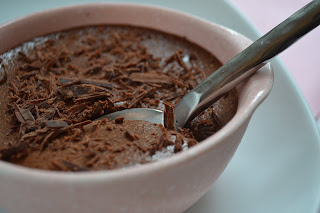
Chocolate Mousse


I found out last Sunday that I was lying to myself...
For years I thought  I knew how to make a Chocolate Mousse!
I better explain this in more details. Last mother's days I got an iphone and with it the compulsion for applications (ok, I confess I had the compulsion before getting the phone seeing all those people having a lot of fun on their phones ...) and of course some of my favorite ones have to do with food. And then last week I was reading one of my favorite blogs when I came across the news that they had launched an application. I will not apologize, sorry, it was just one of those things that I had to have and so I downloaded it. In case you are wondering what application is: Café Fernando. This guy cooks amazing food, does amazing pictures and has an amazing blog. No, I don’t know him but admire his work a lot. And I am pretty happy I have nice recipes going with me anywhere.
So, back to the chocolate mousse. The recipe I tried ( and I just had to because I was almost liking my phone's screen) is his Classic Chocolate Mousse. I will not write the recipe here because I wouldn’t like if someone copied one of mine and published without asking permission. I can just tell you that it was the most amazing, light, delicate and at the same time strong chocolate mouse that I ever tried and from now on I will archive my old recipe and just use this one.
I hope you get really content with the pictures only and in case you want to try make it yourself just go to Cafe Fernando and follow the instructions. I strongly recommend you to give it a try. If like me you just LOVE chocolate anytime this is for you.

Click here to check the recipe.

May 14, 2011

The Easiest Pie Ever


Saturday afternoon. You want to eat something different but you don’t want to spend ages in the kitchen. The best choice: what I call “The Easiest Pie Ever”.
I learned this recipe with my Grandma years ago when I was still a teenager and was starting my adventures in the kitchen. I remember she always prepared this pie for an earlier dinner or afternoon snack on weekends. It is very simple and quick to make and you can choose whatever filling you like. And one more thing, it always works if you follow the quantities from the recipe.
This time I chose to make my pie with a filling of turkey breast, mushrooms and vegetables. Since I wanted nice pictures to share with you I baked the pie in a round spring-form tin. However if you are looking for something really easy you can just use an oven-proof serving dish.
So, here goes the recipe:
Pie Dough
2 eggs
½ cup of canola oil
1 cup of milk
1 ½ cup of all-purpose flour
½ cup of grated Parmesan cheese
1 teaspoon of baking powder
½ teaspoon of salt

Filling
1 cup of turkey breast chopped
1 cup of button mushrooms chopped
½ cup of chopped onions
½ cup of tomatoes without skin and seeds, chopped
½ cup of broccoli chopped
¼ cup of black olives chopped
¼ cup of green olives
Salt, black pepper and oregano for seasoning
1 teaspoon of cooking or canola oil


Pre-heat the oven to 180° C. Butter a round spring-form tin or use parchment paper.
Start chopping all the ingredients for the filling. In a medium saucepan, add the oil and sauté the onions until soft. Add the tomatoes, the turkey breast and the broccoli and cook for 5 minutes. Add the mushrooms, olives and season with salt, black pepper and oregano. Cook for 5 minutes more.
In a blender add all the ingredients for the pie dough and mix it for 2 to 3 minutes.
Transfer half the dough to the tin.
Add the filling.

Add the other half of the dough and if you want sprinkle some Parmesan cheese on the top of the pie.
Bring the tin to the oven and cook for 35 minutes or until the top of the pie is golden and the center is firm.

Remove the pie from the tin and serve it warm .

Enjoy!